#!/usr/bin/env python
# coding: utf-8
# In[1]:
# Copyright 2019 NVIDIA Corporation. All Rights Reserved.
#
# Licensed under the Apache License, Version 2.0 (the "License");
# you may not use this file except in compliance with the License.
# You may obtain a copy of the License at
#
# http://www.apache.org/licenses/LICENSE-2.0
#
# Unless required by applicable law or agreed to in writing, software
# distributed under the License is distributed on an "AS IS" BASIS,
# WITHOUT WARRANTIES OR CONDITIONS OF ANY KIND, either express or implied.
# See the License for the specific language governing permissions and
# limitations under the License.
# ==============================================================================
#  #
# # Torch-TensorRT Getting Started - ResNet 50
# ## Overview
#
# In the practice of developing machine learning models, there are few tools as approachable as PyTorch for developing and experimenting in designing machine learning models. The power of PyTorch comes from its deep integration into Python, its flexibility and its approach to automatic differentiation and execution (eager execution). However, when moving from research into production, the requirements change and we may no longer want that deep Python integration and we want optimization to get the best performance we can on our deployment platform. In PyTorch 1.0, TorchScript was introduced as a method to separate your PyTorch model from Python, make it portable and optimizable. TorchScript uses PyTorch's JIT compiler to transform your normal PyTorch code which gets interpreted by the Python interpreter to an intermediate representation (IR) which can have optimizations run on it and at runtime can get interpreted by the PyTorch JIT interpreter. For PyTorch this has opened up a whole new world of possibilities, including deployment in other languages like C++. It also introduces a structured graph based format that we can use to do down to the kernel level optimization of models for inference.
#
# When deploying on NVIDIA GPUs TensorRT, NVIDIA's Deep Learning Optimization SDK and Runtime is able to take models from any major framework and specifically tune them to perform better on specific target hardware in the NVIDIA family be it an A100, TITAN V, Jetson Xavier or NVIDIA's Deep Learning Accelerator. TensorRT performs a couple sets of optimizations to achieve this. TensorRT fuses layers and tensors in the model graph, it then uses a large kernel library to select implementations that perform best on the target GPU. TensorRT also has strong support for reduced operating precision execution which allows users to leverage the Tensor Cores on Volta and newer GPUs as well as reducing memory and computation footprints on device.
#
# Torch-TensorRT is a compiler that uses TensorRT to optimize TorchScript code, compiling standard TorchScript modules into ones that internally run with TensorRT optimizations. This enables you to continue to remain in the PyTorch ecosystem, using all the great features PyTorch has such as module composability, its flexible tensor implementation, data loaders and more. Torch-TensorRT is available to use with both PyTorch and LibTorch.
# ### Learning objectives
#
# This notebook demonstrates the steps for compiling a TorchScript module with Torch-TensorRT on a pretrained ResNet-50 network, and running it to test the speedup obtained.
#
# ## Content
# 1. [Requirements](#1)
# 1. [ResNet-50 Overview](#2)
# 1. [Running the model without optimizations](#3)
# 1. [Accelerating with Torch-TensorRT](#4)
# 1. [Conclusion](#5)
# In[2]:
get_ipython().system('nvidia-smi')
get_ipython().system('pip install ipywidgets --trusted-host pypi.org --trusted-host pypi.python.org --trusted-host=files.pythonhosted.org')
#
# ## 1. Requirements
#
# NVIDIA's NGC provides PyTorch Docker Container which contains PyTorch and Torch-TensorRT. We can make use of [latest pytorch](https://catalog.ngc.nvidia.com/orgs/nvidia/containers/pytorch) container to run this notebook.
#
# Otherwise, you can follow the steps in `notebooks/README` to prepare a Docker container yourself, within which you can run this demo notebook.
#
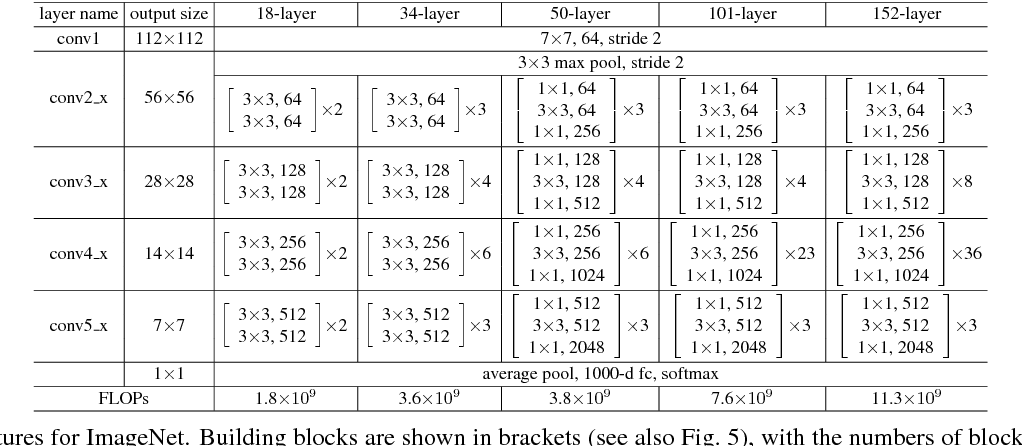
# ## 2. ResNet-50 Overview
#
#
# PyTorch has a model repository called the PyTorch Hub, which is a source for high quality implementations of common models. We can get our ResNet-50 model from there pretrained on ImageNet.
#
# ### Model Description
#
# This ResNet-50 model is based on the [Deep Residual Learning for Image Recognition](https://arxiv.org/pdf/1512.03385.pdf) paper, which describes ResNet as “a method for detecting objects in images using a single deep neural network". The input size is fixed to 32x32.
#
#
#
# # Torch-TensorRT Getting Started - ResNet 50
# ## Overview
#
# In the practice of developing machine learning models, there are few tools as approachable as PyTorch for developing and experimenting in designing machine learning models. The power of PyTorch comes from its deep integration into Python, its flexibility and its approach to automatic differentiation and execution (eager execution). However, when moving from research into production, the requirements change and we may no longer want that deep Python integration and we want optimization to get the best performance we can on our deployment platform. In PyTorch 1.0, TorchScript was introduced as a method to separate your PyTorch model from Python, make it portable and optimizable. TorchScript uses PyTorch's JIT compiler to transform your normal PyTorch code which gets interpreted by the Python interpreter to an intermediate representation (IR) which can have optimizations run on it and at runtime can get interpreted by the PyTorch JIT interpreter. For PyTorch this has opened up a whole new world of possibilities, including deployment in other languages like C++. It also introduces a structured graph based format that we can use to do down to the kernel level optimization of models for inference.
#
# When deploying on NVIDIA GPUs TensorRT, NVIDIA's Deep Learning Optimization SDK and Runtime is able to take models from any major framework and specifically tune them to perform better on specific target hardware in the NVIDIA family be it an A100, TITAN V, Jetson Xavier or NVIDIA's Deep Learning Accelerator. TensorRT performs a couple sets of optimizations to achieve this. TensorRT fuses layers and tensors in the model graph, it then uses a large kernel library to select implementations that perform best on the target GPU. TensorRT also has strong support for reduced operating precision execution which allows users to leverage the Tensor Cores on Volta and newer GPUs as well as reducing memory and computation footprints on device.
#
# Torch-TensorRT is a compiler that uses TensorRT to optimize TorchScript code, compiling standard TorchScript modules into ones that internally run with TensorRT optimizations. This enables you to continue to remain in the PyTorch ecosystem, using all the great features PyTorch has such as module composability, its flexible tensor implementation, data loaders and more. Torch-TensorRT is available to use with both PyTorch and LibTorch.
# ### Learning objectives
#
# This notebook demonstrates the steps for compiling a TorchScript module with Torch-TensorRT on a pretrained ResNet-50 network, and running it to test the speedup obtained.
#
# ## Content
# 1. [Requirements](#1)
# 1. [ResNet-50 Overview](#2)
# 1. [Running the model without optimizations](#3)
# 1. [Accelerating with Torch-TensorRT](#4)
# 1. [Conclusion](#5)
# In[2]:
get_ipython().system('nvidia-smi')
get_ipython().system('pip install ipywidgets --trusted-host pypi.org --trusted-host pypi.python.org --trusted-host=files.pythonhosted.org')
#
# ## 1. Requirements
#
# NVIDIA's NGC provides PyTorch Docker Container which contains PyTorch and Torch-TensorRT. We can make use of [latest pytorch](https://catalog.ngc.nvidia.com/orgs/nvidia/containers/pytorch) container to run this notebook.
#
# Otherwise, you can follow the steps in `notebooks/README` to prepare a Docker container yourself, within which you can run this demo notebook.
#
# ## 2. ResNet-50 Overview
#
#
# PyTorch has a model repository called the PyTorch Hub, which is a source for high quality implementations of common models. We can get our ResNet-50 model from there pretrained on ImageNet.
#
# ### Model Description
#
# This ResNet-50 model is based on the [Deep Residual Learning for Image Recognition](https://arxiv.org/pdf/1512.03385.pdf) paper, which describes ResNet as “a method for detecting objects in images using a single deep neural network". The input size is fixed to 32x32.
#
#  #
#
#
#
# ## 3. Running the model without optimizations
#
#
# PyTorch has a model repository called `timm`, which is a source for high quality implementations of computer vision models. We can get our EfficientNet model from there pretrained on ImageNet.
# In[3]:
import torch
import torchvision
torch.hub._validate_not_a_forked_repo=lambda a,b,c: True
resnet50_model = torch.hub.load('pytorch/vision:v0.10.0', 'resnet50', pretrained=True)
resnet50_model.eval()
# With our model loaded, let's proceed to downloading some images!
# In[4]:
get_ipython().system('mkdir -p ./data')
get_ipython().system('wget -O ./data/img0.JPG "https://d17fnq9dkz9hgj.cloudfront.net/breed-uploads/2018/08/siberian-husky-detail.jpg?bust=1535566590&width=630"')
get_ipython().system('wget -O ./data/img1.JPG "https://www.hakaimagazine.com/wp-content/uploads/header-gulf-birds.jpg"')
get_ipython().system('wget -O ./data/img2.JPG "https://www.artis.nl/media/filer_public_thumbnails/filer_public/00/f1/00f1b6db-fbed-4fef-9ab0-84e944ff11f8/chimpansee_amber_r_1920x1080.jpg__1920x1080_q85_subject_location-923%2C365_subsampling-2.jpg"')
get_ipython().system('wget -O ./data/img3.JPG "https://www.familyhandyman.com/wp-content/uploads/2018/09/How-to-Avoid-Snakes-Slithering-Up-Your-Toilet-shutterstock_780480850.jpg"')
get_ipython().system('wget -O ./data/imagenet_class_index.json "https://s3.amazonaws.com/deep-learning-models/image-models/imagenet_class_index.json"')
# All pre-trained models expect input images normalized in the same way,
# i.e. mini-batches of 3-channel RGB images of shape `(3 x H x W)`, where `H` and `W` are expected to be at least `224`.
# The images have to be loaded in to a range of `[0, 1]` and then normalized using `mean = [0.485, 0.456, 0.406]`
# and `std = [0.229, 0.224, 0.225]`.
#
# Here's a sample execution.
# In[5]:
from PIL import Image
from torchvision import transforms
import matplotlib.pyplot as plt
import json
fig, axes = plt.subplots(nrows=2, ncols=2)
for i in range(4):
img_path = './data/img%d.JPG'%i
img = Image.open(img_path)
preprocess = transforms.Compose([
transforms.Resize(256),
transforms.CenterCrop(224),
transforms.ToTensor(),
transforms.Normalize(mean=[0.485, 0.456, 0.406], std=[0.229, 0.224, 0.225]),
])
input_tensor = preprocess(img)
plt.subplot(2,2,i+1)
plt.imshow(img)
plt.axis('off')
# loading labels
with open("./data/imagenet_class_index.json") as json_file:
d = json.load(json_file)
# Throughout this tutorial, we will be making use of some utility functions; `rn50_preprocess` for preprocessing input images, `predict` to use the model for prediction and `benchmark` to benchmark the inference. You do not need to understand/go through these utilities to make use of Torch TensorRT, but are welecomed to do so if you choose.
# In[6]:
import numpy as np
import time
import torch.backends.cudnn as cudnn
cudnn.benchmark = True
def rn50_preprocess():
preprocess = transforms.Compose([
transforms.Resize(256),
transforms.CenterCrop(224),
transforms.ToTensor(),
transforms.Normalize(mean=[0.485, 0.456, 0.406], std=[0.229, 0.224, 0.225]),
])
return preprocess
# decode the results into ([predicted class, description], probability)
def predict(img_path, model):
img = Image.open(img_path)
preprocess = rn50_preprocess()
input_tensor = preprocess(img)
input_batch = input_tensor.unsqueeze(0) # create a mini-batch as expected by the model
# move the input and model to GPU for speed if available
if torch.cuda.is_available():
input_batch = input_batch.to('cuda')
model.to('cuda')
with torch.no_grad():
output = model(input_batch)
# Tensor of shape 1000, with confidence scores over Imagenet's 1000 classes
sm_output = torch.nn.functional.softmax(output[0], dim=0)
ind = torch.argmax(sm_output)
return d[str(ind.item())], sm_output[ind] #([predicted class, description], probability)
def benchmark(model, input_shape=(1024, 1, 224, 224), dtype='fp32', nwarmup=50, nruns=10000):
input_data = torch.randn(input_shape)
input_data = input_data.to("cuda")
if dtype=='fp16':
input_data = input_data.half()
print("Warm up ...")
with torch.no_grad():
for _ in range(nwarmup):
features = model(input_data)
torch.cuda.synchronize()
print("Start timing ...")
timings = []
with torch.no_grad():
for i in range(1, nruns+1):
start_time = time.time()
features = model(input_data)
torch.cuda.synchronize()
end_time = time.time()
timings.append(end_time - start_time)
if i%10==0:
print('Iteration %d/%d, ave batch time %.2f ms'%(i, nruns, np.mean(timings)*1000))
print("Input shape:", input_data.size())
print("Output features size:", features.size())
print('Average batch time: %.2f ms'%(np.mean(timings)*1000))
# With the model downloaded and the util functions written, let's just quickly see some predictions, and benchmark the model in its current un-optimized state.
# In[7]:
for i in range(4):
img_path = './data/img%d.JPG'%i
img = Image.open(img_path)
pred, prob = predict(img_path, resnet50_model)
print('{} - Predicted: {}, Probablility: {}'.format(img_path, pred, prob))
plt.subplot(2,2,i+1)
plt.imshow(img);
plt.axis('off');
plt.title(pred[1])
# In[8]:
# Model benchmark without Torch-TensorRT
model = resnet50_model.eval().to("cuda")
benchmark(model, input_shape=(128, 3, 224, 224), nruns=100)
#
# ## 4. Accelerating with Torch-TensorRT
# Onwards to the next step, accelerating with Torch TensorRT. In these examples we showcase the results for FP32 (single precision) and FP16 (half precision). We do not demonstrat specific tuning, just showcase the simplicity of usage. If you want to learn more about the possible customizations, visit our [documentation](https://nvidia.github.io/Torch-TensorRT/).
# ### FP32 (single precision)
# In[9]:
import torch_tensorrt
# The compiled module will have precision as specified by "op_precision".
# Here, it will have FP32 precision.
trt_model_fp32 = torch_tensorrt.compile(model, inputs = [torch_tensorrt.Input((128, 3, 224, 224), dtype=torch.float32)],
enabled_precisions = torch.float32, # Run with FP32
workspace_size = 1 << 22
)
# In[10]:
# Obtain the average time taken by a batch of input
benchmark(trt_model_fp32, input_shape=(128, 3, 224, 224), nruns=100)
# ### FP16 (half precision)
# In[11]:
import torch_tensorrt
# The compiled module will have precision as specified by "op_precision".
# Here, it will have FP16 precision.
trt_model_fp16 = torch_tensorrt.compile(model, inputs = [torch_tensorrt.Input((128, 3, 224, 224), dtype=torch.half)],
enabled_precisions = {torch.half}, # Run with FP32
workspace_size = 1 << 22
)
# In[13]:
# Obtain the average time taken by a batch of input
benchmark(trt_model_fp16, input_shape=(128, 3, 224, 224), dtype='fp16', nruns=100)
#
# ## 5. Conclusion
#
# In this notebook, we have walked through the complete process of compiling TorchScript models with Torch-TensorRT for EfficientNet-B0 model and test the performance impact of the optimization. With Torch-TensorRT, we observe a speedup of **1.84x** with FP32, and **5.2x** with FP16 on an NVIDIA 3090 GPU. These acceleration numbers will vary from GPU to GPU(as well as implementation to implementation based on the ops used) and we encorage you to try out latest generation of Data center compute cards for maximum acceleration.
#
# ### What's next
# Now it's time to try Torch-TensorRT on your own model. If you run into any issues, you can fill them at https://github.com/NVIDIA/Torch-TensorRT. Your involvement will help future development of Torch-TensorRT.
#
#
#
#
#
# ## 3. Running the model without optimizations
#
#
# PyTorch has a model repository called `timm`, which is a source for high quality implementations of computer vision models. We can get our EfficientNet model from there pretrained on ImageNet.
# In[3]:
import torch
import torchvision
torch.hub._validate_not_a_forked_repo=lambda a,b,c: True
resnet50_model = torch.hub.load('pytorch/vision:v0.10.0', 'resnet50', pretrained=True)
resnet50_model.eval()
# With our model loaded, let's proceed to downloading some images!
# In[4]:
get_ipython().system('mkdir -p ./data')
get_ipython().system('wget -O ./data/img0.JPG "https://d17fnq9dkz9hgj.cloudfront.net/breed-uploads/2018/08/siberian-husky-detail.jpg?bust=1535566590&width=630"')
get_ipython().system('wget -O ./data/img1.JPG "https://www.hakaimagazine.com/wp-content/uploads/header-gulf-birds.jpg"')
get_ipython().system('wget -O ./data/img2.JPG "https://www.artis.nl/media/filer_public_thumbnails/filer_public/00/f1/00f1b6db-fbed-4fef-9ab0-84e944ff11f8/chimpansee_amber_r_1920x1080.jpg__1920x1080_q85_subject_location-923%2C365_subsampling-2.jpg"')
get_ipython().system('wget -O ./data/img3.JPG "https://www.familyhandyman.com/wp-content/uploads/2018/09/How-to-Avoid-Snakes-Slithering-Up-Your-Toilet-shutterstock_780480850.jpg"')
get_ipython().system('wget -O ./data/imagenet_class_index.json "https://s3.amazonaws.com/deep-learning-models/image-models/imagenet_class_index.json"')
# All pre-trained models expect input images normalized in the same way,
# i.e. mini-batches of 3-channel RGB images of shape `(3 x H x W)`, where `H` and `W` are expected to be at least `224`.
# The images have to be loaded in to a range of `[0, 1]` and then normalized using `mean = [0.485, 0.456, 0.406]`
# and `std = [0.229, 0.224, 0.225]`.
#
# Here's a sample execution.
# In[5]:
from PIL import Image
from torchvision import transforms
import matplotlib.pyplot as plt
import json
fig, axes = plt.subplots(nrows=2, ncols=2)
for i in range(4):
img_path = './data/img%d.JPG'%i
img = Image.open(img_path)
preprocess = transforms.Compose([
transforms.Resize(256),
transforms.CenterCrop(224),
transforms.ToTensor(),
transforms.Normalize(mean=[0.485, 0.456, 0.406], std=[0.229, 0.224, 0.225]),
])
input_tensor = preprocess(img)
plt.subplot(2,2,i+1)
plt.imshow(img)
plt.axis('off')
# loading labels
with open("./data/imagenet_class_index.json") as json_file:
d = json.load(json_file)
# Throughout this tutorial, we will be making use of some utility functions; `rn50_preprocess` for preprocessing input images, `predict` to use the model for prediction and `benchmark` to benchmark the inference. You do not need to understand/go through these utilities to make use of Torch TensorRT, but are welecomed to do so if you choose.
# In[6]:
import numpy as np
import time
import torch.backends.cudnn as cudnn
cudnn.benchmark = True
def rn50_preprocess():
preprocess = transforms.Compose([
transforms.Resize(256),
transforms.CenterCrop(224),
transforms.ToTensor(),
transforms.Normalize(mean=[0.485, 0.456, 0.406], std=[0.229, 0.224, 0.225]),
])
return preprocess
# decode the results into ([predicted class, description], probability)
def predict(img_path, model):
img = Image.open(img_path)
preprocess = rn50_preprocess()
input_tensor = preprocess(img)
input_batch = input_tensor.unsqueeze(0) # create a mini-batch as expected by the model
# move the input and model to GPU for speed if available
if torch.cuda.is_available():
input_batch = input_batch.to('cuda')
model.to('cuda')
with torch.no_grad():
output = model(input_batch)
# Tensor of shape 1000, with confidence scores over Imagenet's 1000 classes
sm_output = torch.nn.functional.softmax(output[0], dim=0)
ind = torch.argmax(sm_output)
return d[str(ind.item())], sm_output[ind] #([predicted class, description], probability)
def benchmark(model, input_shape=(1024, 1, 224, 224), dtype='fp32', nwarmup=50, nruns=10000):
input_data = torch.randn(input_shape)
input_data = input_data.to("cuda")
if dtype=='fp16':
input_data = input_data.half()
print("Warm up ...")
with torch.no_grad():
for _ in range(nwarmup):
features = model(input_data)
torch.cuda.synchronize()
print("Start timing ...")
timings = []
with torch.no_grad():
for i in range(1, nruns+1):
start_time = time.time()
features = model(input_data)
torch.cuda.synchronize()
end_time = time.time()
timings.append(end_time - start_time)
if i%10==0:
print('Iteration %d/%d, ave batch time %.2f ms'%(i, nruns, np.mean(timings)*1000))
print("Input shape:", input_data.size())
print("Output features size:", features.size())
print('Average batch time: %.2f ms'%(np.mean(timings)*1000))
# With the model downloaded and the util functions written, let's just quickly see some predictions, and benchmark the model in its current un-optimized state.
# In[7]:
for i in range(4):
img_path = './data/img%d.JPG'%i
img = Image.open(img_path)
pred, prob = predict(img_path, resnet50_model)
print('{} - Predicted: {}, Probablility: {}'.format(img_path, pred, prob))
plt.subplot(2,2,i+1)
plt.imshow(img);
plt.axis('off');
plt.title(pred[1])
# In[8]:
# Model benchmark without Torch-TensorRT
model = resnet50_model.eval().to("cuda")
benchmark(model, input_shape=(128, 3, 224, 224), nruns=100)
#
# ## 4. Accelerating with Torch-TensorRT
# Onwards to the next step, accelerating with Torch TensorRT. In these examples we showcase the results for FP32 (single precision) and FP16 (half precision). We do not demonstrat specific tuning, just showcase the simplicity of usage. If you want to learn more about the possible customizations, visit our [documentation](https://nvidia.github.io/Torch-TensorRT/).
# ### FP32 (single precision)
# In[9]:
import torch_tensorrt
# The compiled module will have precision as specified by "op_precision".
# Here, it will have FP32 precision.
trt_model_fp32 = torch_tensorrt.compile(model, inputs = [torch_tensorrt.Input((128, 3, 224, 224), dtype=torch.float32)],
enabled_precisions = torch.float32, # Run with FP32
workspace_size = 1 << 22
)
# In[10]:
# Obtain the average time taken by a batch of input
benchmark(trt_model_fp32, input_shape=(128, 3, 224, 224), nruns=100)
# ### FP16 (half precision)
# In[11]:
import torch_tensorrt
# The compiled module will have precision as specified by "op_precision".
# Here, it will have FP16 precision.
trt_model_fp16 = torch_tensorrt.compile(model, inputs = [torch_tensorrt.Input((128, 3, 224, 224), dtype=torch.half)],
enabled_precisions = {torch.half}, # Run with FP32
workspace_size = 1 << 22
)
# In[13]:
# Obtain the average time taken by a batch of input
benchmark(trt_model_fp16, input_shape=(128, 3, 224, 224), dtype='fp16', nruns=100)
#
# ## 5. Conclusion
#
# In this notebook, we have walked through the complete process of compiling TorchScript models with Torch-TensorRT for EfficientNet-B0 model and test the performance impact of the optimization. With Torch-TensorRT, we observe a speedup of **1.84x** with FP32, and **5.2x** with FP16 on an NVIDIA 3090 GPU. These acceleration numbers will vary from GPU to GPU(as well as implementation to implementation based on the ops used) and we encorage you to try out latest generation of Data center compute cards for maximum acceleration.
#
# ### What's next
# Now it's time to try Torch-TensorRT on your own model. If you run into any issues, you can fill them at https://github.com/NVIDIA/Torch-TensorRT. Your involvement will help future development of Torch-TensorRT.
#